
Did you ever have a recipe for something that everyone loves but you? It’s not that I hate pumpkin pie…I just don’t LOVE pumpkin pie. And yet, every year my family—and extended family on the Italian side—beg me to make my pumpkin pie from scratch. I don’t mind making it. I don’t mind eating it, either. But I definitely won’t eat it without vanilla ice cream and homemade whipped cream on it.
If I had my dessert choice, I’d make my fresh cranberry sauce and mix it with whipped cream for a fluffy, fresh cranberry whip.
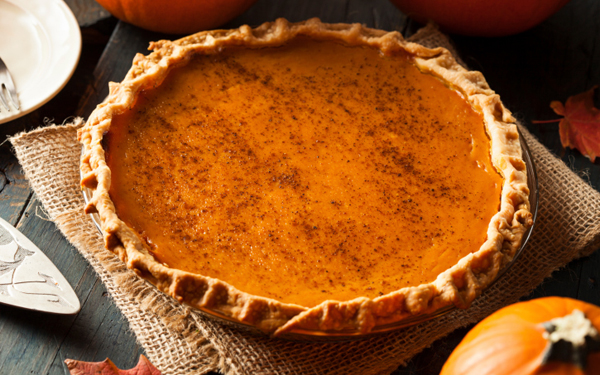
I start by making pie dough from scratch. It’s really not that hard, and it’s massively impressive to most people. Although, do not expect my pie dough to ever look like anything that came out of Martha Stewart’s kitchen. Let’s just say I make a “rustic” pie. I don’t care about leaves made out of crust and stuff like that. After all, it’s just going to get eaten! All I care about is taste. And this tastes good.
Pie Dough
Ingredients:
- 1½ cups organic flour
- ½ teaspoon salt
- 1 Tablespoon sugar
- 10 Tablespoons cold, or even frozen, lard or butter
- 6 Tablespoons ice water
Directions:
1. Put the flour, salt, and sugar in a bowl.
2. Cut the lard or butter into small bits (if it’s frozen, I use a cheese grater).
3. With your fingers, smoosh and mix the fat and the flour until the mixture resembles a coarse “corn meal” mixture. Be gentle, relax, and enjoy the sensual pleasure of mixing the fat and flour!
4. Add a few tablespoons of water and mix together gently until the dough sticks together.
5. Wrap up the dough in wax paper or a plastic bag and put it in the fridge for a half hour.
6. Flour your work surface and flour your rolling pin, too. Take the dough out and roll it until it’s as thin or thick as you want it and the right size for your pie plate.
7. Carefully lift the dough off the surface and put it into a pie plate, and press it gently into place.
8. Crimp the edges.
You can put the leftover dough into the oven on a cookie sheet with some salt, and bake until crispy, and your whole family will come running to eat it…just make sure to wait until the pieces are a bit cool or there will be burnt tongues all over the house!
Pumpkin Pie Filling
Ingredients:
- 2 cups cooked pumpkin*
- ¼ cup white sugar
- ¼ cup brown sugar
- ¼ cup maple syrup
- Dash of molasses (1 or 2 Tablespoons)
- 2 eggs
- 1 teaspoon cinnamon
- ¼ teaspoon ginger
- ¼ teaspoon ground cloves
- ¼ teaspoon nutmeg
- 1 cup cream
- ½ teaspoon salt
* If you are making the pumpkin from scratch, as I usually do, take a baking pumpkin and cut the top off and pull the seeds out. Bake it in an oven until it collapses (350 degrees for about an hour). Peal off the skin, the rest is the good stuff. Put it into a blender to smooth it out. If you just mash it by hand, the filling will still taste good, but the texture will be stringy as opposed to smooth. Both methods are fine.
Directions:
1. Put all the ingredients into a bowl and mix together until you have a brownish gooey mess.
2. Pour into the crust.
3. Bake in the oven for about an hour: Start the oven at 425 degrees, then after 15 minutes, reduce it to 350. If the crust starts to burn before the pie is done, cover it with tin foil.
6. Test for doneness the way you do a cake—stick a knife in and if it comes out clean, it’s done.
7. Enjoy with ice cream and whipped cream!
Looking for more Thanksgiving recipes? Here are some of my favorites:
- How to Find and Cook an Organic Turkey
- Cranberry Sauce
- Mrs. Cinquino’s Stuffing
- Buttery Biscuits in a Snap
- Popovers
- Hot Apple Cider
Come back on Wednesday for a fast and fancy Thanksgiving drink!

Maria, I love pumpkin pie! In fact, I’m a bit pumpkin obsessed lately. I grow my own pumpkin and then I cook it, puree it, and store it in the freezer for use all year round. So I’m always looking for new recipes, Pumpkin Soup, Pumpkin Dip, and my new favorite – Pumpkin Nutella Bread. If you don’t like pumpkin pie very much you should try the bread recipe, it is sure to turn you into a devoted pumpkin fan (and an added bonus you don’t have to make a crust! To see this recipe or try any of my other pumpkin recipes go to http://thegivinggarden.wordpress.com/2010/11/11/anticipation/
Happy Thanksgiving. As for the cranberry sauce I will be trying out a recipe a friend gave to me and it includes Jalapenos (another one of my favorite things to grow and eat!)
I wouldn’t want to use those instructions for making a crust. Not one that’s flaky, anyway. Whoever wrote this doesn’t make pies. “Brownish gooey mess”? Is this supposed to be a cooking blog? This is a custard pie; like chocolate custard, or lemon custard – this is just pumpkin custard.
You put your 10 tbsp of butter, or lard or both into the flour/dry ingredients. I would not grate it, as that involves holding the lump of butter, and that’s going to warm it, and melt it – makes no sense at all.
One thing to remember for pastry, told to me over and over again by my mother who made fabulously flaky pie crust — is that you do not touch it with your hands unless absolutely necessary. Your hands are warm, they will melt butter/shortening — and the more handling, the tougher your pastry is going to be. Use fingertips if you can.
Cut the butter up in the flour/dry ingredients, with a pastry cutter until it’s the size of peas, or smaller. Fluff the cut-up butter and dry ingredients until the butter bits are pretty much consistently spread throughout. They will be covered in flour.
Begin to sprinkle the ice water over the flour mix. With a fork, between each tablespoon of icewater, start to fluff/flip the flour and butter bits around. Keep this up with each tbsp of ice water, until it’s beginning to cling together. Continue tossing and flipping it with the fork, after the ice water has all been added. Keep it up – continue until there is not very much dry material that’s not attaching itself to something else.
You cannot “mix it gently together”. That doesn’t happen, unless you want a heavy, leaden pastry.
If you keep this up long enough, tossing with the fork, you’ll be able to see the dough begin to come together. It takes 10 or 20 minutes to do this, but is well worth the time. Avoid “stirring” and never touch it with your hands until later.
Then finally, with your hands, scoop it up in the bowl, and press it all together in a ball. Wrap it and refrigerate it at least overnight.
Take it out onto floured board and floured rolling pin as instructed. Cut it in half if you doing a covered pie, or if you’re doing two one-crust pies.
Roll the ball outwards, to the top, sides and towards yourself. You need a large circle, and you can figure it out by putting the pie plate on the dough, and eyeballing how much you need to cover the bottom, go up the sides, and hang over the edge of the pie plate.
Keep rolling until you get there. The dough should not be too thick – definitely less than 1/4″ in thickness. Don’t want it too thin either, or it will not survive.
Then, using a large, wide putty knife, carefully loosen the pastry from the table completely, until there is no area of the pastry sticking to the table. Do this by lifting it up, pushing the putty knife under the rolled dough. When it’s completely loosened, carefully get your hands under the dough, spreading them as wide as you can, and lift the piece onto the pie tin. Press it down to fit into the corners of the pie tin, up and over the edges. Take a knife and run it around the very edge to cut off the overhang.
Take the leftover scraps of pastry, and cut them into strips about 1/2″ wide. With a pastry brush dipped into water, brush the pastry on the turned-over edge of the pie tin, to make it adhesive. Then, take the strips you have cut, and lay those on top of it, pressing them to stick. This will give you a raised edge on the pie crust. You can also use it to build up areas that are missing pie crust.
Then when it’s all in place, and you have your raised crust edge, dip a fork in water, and lay it on this edge, pressing it down so that you have the typical scored impressions on the crust. Do this all around. You can make leaves etc. out of extras, to lay on the pumpkin itself; keeping in mind the “hands off” rule.
I’d also check New Basics cookbook, or James Beard for variations in ingredients.
If baking the pumpkin, cutting it into pieces is far more productive than putting a whole pumpkin in the oven. Canned pumpkin is fine – but not pumpkin pie filling.
Word is “peel”. Church bells “peal”, but it’s peel on fruit and vegs.
Goodness, what a lot of trouble! There are plenty of ways to crust a pie and no one way is the only right one. My mom taught me to make hot water pie crust: mix the dry ingredients, melt the butter and pour it and the boiling water on top of the flour mixture. Stir until JUST blended and you can gather it into a single crumbly ball. No finger tips, no pastry cutter, no fuss. Chill and roll out between sheets of wax paper. Flaky, of course not, but I’ve have never liked the super-flaky stuff anyway. And I can whip it together in about 2 minutes, so I can make a pie whenever I want one.
http://www.youtube.com/watch?v=7s664NsLeFM
Maria, thanks for sharing your recipes!! I’m making the pumpkin pie for Thanksgiving. Can’t wait to try it!!
@Margaret – What a shame you feel the need to tear people apart who enjoy food AND LIFE. Your post was so NASTY!! If you don’t like how other people do things, maybe you should stay in your own little world. You must be a real pleasure to live with!!
Maria – what a great recipe! Thanks for sharing. I have never made a pumpkin pie without using store bought pumpkin before. Can’t wait to watch my pumpkin collapse in the oven (and of course bake your pie!!!). 🙂
I think the beauty of recipes is that they show multiple ways of doing something which allows everyone to learn something new. Everyone bakes things differently and there is certainly no right or wrong way when it comes to making a wonderful pie for your family to enjoy!
Well ladies, I have never claimed to be a great baker! It’s too fussy for me in general to be so exact. However, this pie tastes good and will get eaten and it is from scratch! Thank you and Happy Thanksgiving!
By the way, I just finished cooking my pumpkin and it didn’t collapse — think it was too dry a season here for really juicy pumpkins — but I’m still cooking with it. Just make sure it’s soft.
This pie was delicious! I didn’t have ground cloves or molasses, I used honey instead. The crust was awesome! I even baked the extras(it was a hit!! And flakey) my picky eaters loved it and asked for seconds. Thanks!
you are welcome, Michelle! I’m always so happy to hear that my recipes work for others and especially that kids (picky and non) love it! Thank YOU!
Great recipe. Thanks.
(Hey commenter Margaret: blog envy much?)
This is a delicious and wonderful recipe! Thank you for sharing! I agree, there is no single way to cook or bake things…it takes time to invent recipes and even more to share them. Let’s be kind to one another.
No milk in the pumpkin pie?
nope!
PRO-TIP: I have discovered (due to emergency improvisation) that 5 tablespoons of lard and 5 tablespoons of butter is a WINNING combination. You’re welcome.
Should I wait for the pumpkin to cool before mixing with the eggs?
Maria…..your RUSTIC PUMPKIN PIE sounds delish…….I like anything rustic,so will make this pie…..
Will NEVER try blogger Margaret’s recipe…it might taste nasty..
” Peal off the skin, the rest is the good stuff. Put it into a blender to smooth it out. If you just mash it by hand, the filling will still taste good, but the texture will be stringy as opposed to smooth. Both methods are fine.”
Both methods are NOT fine. Put it in a blender for sure.
(We learned it the hard way one year! 🙂