Part III of my three-part Aussie Meat recipe series
For years I’ve wanted to make puff pastry from scratch. Why? Because that’s the only way I would know for sure it was organic.
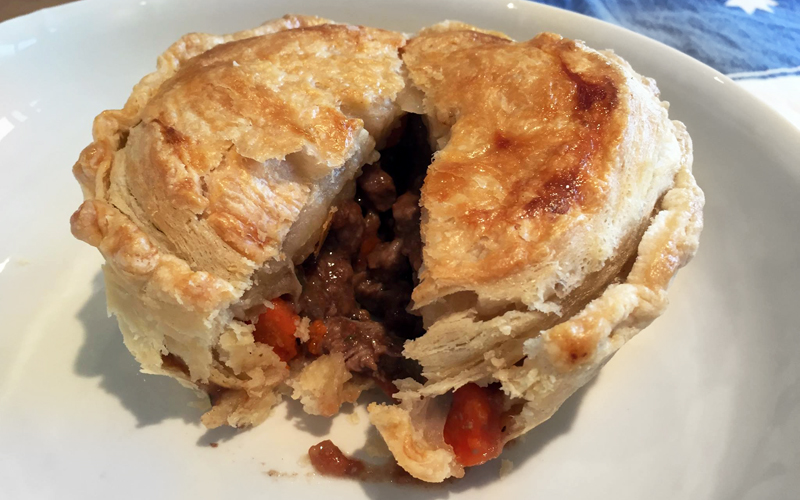
Here’s what you need puff pastry for: piggies in a blanket, Australian Meat Pies, and Aussie Sausage Rolls (recipe to come one day…). I’m sure it has lots of other uses, too (Lucia says just plain puff pastry by itself is good), but these are my main concerns. After all, I prefer savory over sweet any day. Just saying.
When I first started following the recipe from the Bourke Street Bakery, I thought to myself, “Hmmm, only 4 and ¾ oz. butter?!” But then I saw farther down that it called for a whole other POUND of butter. So yes, there’s a lot of butter here.
I’m cutting the recipe in half, so it’s not as bad fat-wise. But the basic premise is fine dough, folded and layered and folded and layered and folded and layered, with layers of butter. I also noticed that it called for repeated 24-hour rests in the fridge. Look, let’s get one thing straight—I am not a pastry chef. I’m a hungry woman who is fundamentally lazy, even though I’m crazy enough to make puff pastry from scratch, so I went with just one. So for that reason, this recipe may not be perfect, but it will be perfectly delicious.
So, let’s say you’re going to make meat pies on a Sunday, start making this on Friday night—Saturday morning at the latest. I’m sure you could make doing this even quicker and easier somehow, but the process is kind of fun, like making a book with pages of pastry….
Puff Pastry from Scratch
Ingredients:
- 4 Tablespoons unsalted butter, cubed
- 2 cups all-purpose flour, chilled (plus a little more for dusting)
- 1½ teaspoons salt
- 1½ teaspoons cider vinegar
- ¾ cup water, chilled
- 16 Tablespoons unsalted butter, chilled
Directions:
WARNING: Puff pastry needs at least 24 hours of advance work. Other than that, it’s not too hard.
Part one:
- Mix the flour and salt in a bowl and toss in the butter, which should be softened slightly. Mix together gently with your fingers.
- Add the vinegar to the water; add the vinegar-water to the dough and mix it together.
- Put it out on the counter (with some flour to dust) and gently knead to make the dough smooth.
- Flatten the dough into a round flat ball and wrap it in plastic then put it in the fridge for 20 minutes.
Part two:
- Take the 16 tablespoons of butter out of the fridge and let it soften a bit.
- Get out some parchment paper and roll out the butter between the sheets to a half-inch-thick 4-inch square (or so).
- Get the pastry out and roll it out on a lightly floured surface to make a 4 x 8″ rectangle. Put the butter at one end and fold it over to cover it. It’s like you are making/wrapping a butter present!
Part three:
- Now the fun begins (the making a book part). Roll the dough out in a long 4 x 18″ sheet. Fold both ends in toward the center as if you are making a “gatefold.” (I found that a spatula helps if it gets stuck.) And then fold it again so you have a “book.” Wrap it up in plastic and then put it in the fridge.
- Wait 30 minutes and then do it again, making sure that the “spine” of the book is always on the left (that’s how you know you are rotating properly).
- Now go to bed. Or whatever. Wait “24 hours,” give or take.
Part four:
- Do this whole rolling, folding, and wraping thing two more times (waiting 30 minutes between each). Let the dough warm up a tiny bit after you take it out from the long refrigerator rest.
- Refrigerate for 30 minutes before doing the final rolling and cutting for your pie lids.
Part five:
- Roll out for the final time. Be gentle when you cut…don’t want to smoosh all those lovely layers!
- Make the lid slightly larger than your pie top because it might shrink a bit when you cook it.
- Use the egg wash (1 raw beaten egg and a bit of water) to glue it together and polish the top.
One day I’ll make a video to go along with this. But in the meantime, if you need a visual cue for the folding (or what the Aussies call “laminating”) process, here’s a video you can watch—although it’s not exactly what I did, so just use it as a general guide.


Yes, even though I LOVE TO BAKE, homemade puff pastry is very rich and labor intensive, it always have been, which is why, even though I am not a lazy baker, (yesterday I made an apple upside down cake from a new recipe from Fine Cooks, which was very labor intensive) I have yet to try to make my own puff pastry from scratch. Someday. Good luck everyone!
Has anyone ever tried this with gluten free flour? Do you have any tips if you have? Thanks!
I was just thinking the very same thing, couldn’t we make this gluten free? The last few things that we can’t seem to find is a great croissant and puffed pastry! It’s totally worth a try! I bet my daughter who LOVES to bake and is my partner in crime, will LOVE to try this one! We will let you know how it goes 🙂 Thank you Maria for sharing!
OMG, Peggy. I couldn’t agree with you more! I really love a good croissant, but haven’t found one GF.
Thank you for your recipes for the pie crust, the puff pastry and the meat pie fillings. It is amazingly easy crust to make, as I am not a barker. The puff pastry turn out fine even my kitchen was streaming hot when I made it. Using chilled flour made the difference.