
by Shelbi Stoneback, associate director of customer experience at Rodale
Did you know that you only need a jar and some water to get start growing more food from your very own kitchen scraps that you might otherwise toss?
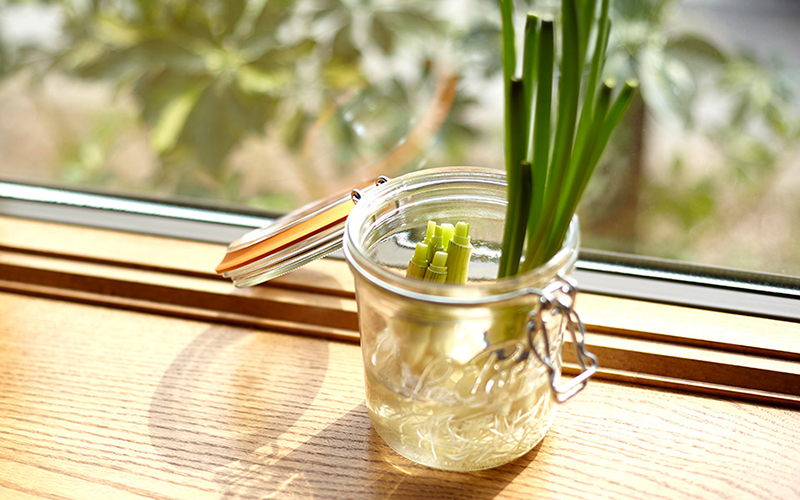
When I told a coworker about this story, her response was, “Wait—that’s like free food!” And she’s exactly right! Why buy green onions every other week for salads and stir-fries when you can regrow them at home for free? For example, I placed scallion bottoms with roots in a small jar with only water, and in just one week I had almost 2 inches of new growth.
Start with these organic veggies, and get more out of your weekly groceries scraps you might otherwise just be throwing away.
- Green Onions
Simply cut your onions as close as you want to the roots, leaving some of the white bulb. Place the roots in a small jar and add enough water to cover them. Set the jar on a windowsill in sunlight. Change the water every few days, and in less than a week, you’ll have new cuttable onions.
TIP: Tie string around them or use a rubberband to keep the bunch of onions together in the jar so they don’t fall over and it’s easier to remove them to change the water.
- Cilantro
Place the bottom of the stem of your cilantro scraps in a glass of water and set the glass in bright sunlight. When the roots grow a few inches long, transplant the cilantro into a small pot, and you will have new sprigs in just a few weeks.
- Lettuce
Enjoy your purchased lettuce, but keep the “heart.” Place it in a container of water in a sunny location, and it will start to regrow a new head of lettuce. You can also plant this newly sprouted lettuce in the ground for a full season’s worth of produce without needing to buy seeds or wait for them to germinate.
- Celery
This crunchy, versatile vegetable is easy to grow from leftover scraps. Just cut off the very bottom of your celery and lay it in a bowl with a little bit of warm water. Keep the bowl in direct sunlight for as long as possible each day. After a week, the leaves will begin to thicken and grow along the base. Once the leaves start growing, transplant your celery into soil, and it will grow to full size.
Did you know? Food waste makes up 25 percent, by weight, of all garbage that gets sent to landfills. There, it decomposes and creates methane, a greenhouse gas that’s 25 times more potent than carbon dioxide.
- Sweet Potatoes
Cut a sweet potato in half. Using toothpicks, suspend it over a container of shallow water. New roots and sprouts will begin to appear in just a few days. Once those sprouts are about 4 inches in length, twist them off and place them in a container of water. When the roots from this container reach about an inch in length, you can plant them in a soil-filled container.
- Potatoes
If your potato peels have eyes, then you can start a new crop with just the peels! Cut peelings into 2-inch pieces with two or three eyes on each. Let the pieces dry out overnight and then plant them about 4 inches deep in the soil or a container. Face the eyes up when planting. The potato plants will grow in a few weeks.
- Garlic
Garlic is easy to grow from just one clove. Plant the clove with the roots facing down in a container or soil. Place the container in direct sunlight. Once new shoots are established, cut the shoots back; your plant will produce a bulb. Garlic scapes, or the long green shoots that grow out of the garlic, are one of my favorite garnishes to cook with and eat when they are in season. I like to add them to a fresh corn salad or scrambled eggs. They have a much lighter, subtler flavor than garlic cloves.
- Ginger
Cultivating this root that’s a staple ingredient in many Asian recipes and is also perfect as a tea or in a cocktail might seem a daunting task, but it’s actually not hard to grow. Here are 5 easy steps for raising ginger at home:
- Choose the right root. Start with a piece of organic ginger you’ve cut to the size of your thumb. Choose a plump chunk, being sure to leave several bumpy nodules (buds) at the tips. Skin on the delicate buds should be thinner and lighter colored; forgo pieces with darkened buds. Like conventional potatoes, conventional ginger is irradiated and chemically treated to stop it from sprouting at the supermarket, so choose organic.
- Ginger takes its time getting started. To speed it along, create a terrarium using a takeout container with a clear lid. Choose a container that’s just a few inches larger than your seed, and punch drainage holes in the bottom. Put an inch or two of potting soil below the seed and sprinkle just a half-inch over the top to cover it. Water well. Replace the lid, but don’t seal it. Maintain the soil at 70 degrees and moist to the touch, watering only when the soil dries. A sprout will emerge in six to eight weeks.
- Pot it up. Ginger is a heavy feeder and an even heavier drinker that needs a lot of room to grow. Given the space, a chunk the size of your thumb will easily grow to fill a two-gallon pot over the course of about six months. Choose a container with good drainage holes and a deep saucer. Use well-draining, fertile soil with plenty of coir. Gently place your pre-sprouted rhizome on top of 4 inches of soil and bury all but the sprout tip. Place it in a warm, sunny window or in a sunny, sheltered spot outdoors where temperatures range from 60 to 90 degrees.
- Harvest. Hold the greens at their base (where they emerge from the soil) and lift the entire rhizome—this is a good project to do outdoors, over an old newspaper or drop cloth. Snap off a chunk of the rhizome, then place the rest of the plant back in its pot, sprinkle on more potting soil or compost, water heavily, and treat it gently for a few days. As with any fragile transplant, protect it from glaring sunlight and wild temperature swings for a few days while it recovers.
- Enjoy. Baby ginger has a mild flavor, and unlike its cured counterpart, it’s juicy, with more snap and less string. Best of all, the skin is so thin and pretty, there’s no need to peel.
 Shelbi Stoneback is associate director of customer experience at Rodale. In sixth grade, she started a juice-box recycling campaign at her elementary school and has been championing sustainability and organic living ever since. She’s a hand model, loud whistler, and polar plunger, and also an avid sea glass collector and treasure hunter, with the prides of her collection being a fossilized great white shark tooth, a message in a bottle, and several 19th-century pot lids.
Portions of this story were originally published on Rodale’s Organic Life.

thanks for the reminder. Young people need to know this information. You are a wonderful teacher and I appreciate your site.
vivian
Cincinnati