Is it possible to garden without plastic? That’s the challenge I’ve set for myself with the help of Rodale.com and Eric Hurlock of OrganicGardening.com. (See my blog, MyPlasticfreeLife.com, to understand the problems with plastic and get tips for how to live with as little of it as possible.)
In Part 1, I described how I built a raised bed using sustainable wood, and filled it with bulk gardening soil delivered without plastic packaging.
In Part 2, I planted seeds purchased in paper packets, or seedlings sold in compostable eco-pots, mulched the garden with straw, and ended up with a tiny bit of plastic.
And now, for one of my biggest plastic dilemmas…plastic-free watering.
Thinking I’d need to water my plants with a hose, I did a ton of research to find out if there was a plastic-free garden hose I could buy. The search turned out to be more difficult, and took longer, than I expected. So, since I’d already put my plants and seeds in the ground, I watered using the plastic hose we already had for the first few days. But the experience was frustrating. Despite the billion and one different settings on the nozzle, I couldn’t find a gentle enough spray to avoid beating my plants to death and washing away my soil.
And my research on hoses was disappointing. I learned that many hoses are made out of PVC, a plastic which is known to leach lead and hormone-disrupting phthalates. Hoses made out of rubber are generally not made from natural rubber but EDPM, a synthetic rubber derived from petroleum, not natural latex. But take note: synthetic rubber isn’t marked as such on the package. The only way to know if a hose is made from natural or synthetic rubber is to call the company and ask, which I did. Multiple companies, multiple times.
I didn’t find a natural rubber hose (although there still might be one out there), but even if I had, I’d still have to worry about the metal fittings on the ends. Many hose fittings are made of brass, which can leach lead into the water. In fact, in an effort to avoid plastic, I almost bought an all metal spray nozzle…before I turned over the package and found that it contained lead!
The most promising hose I found seems to be the GatorHyde hose, made from 50% recycled polyurethane (supposedly a safer plastic than PVC), which has nickel-plated ends and is touted as being “drinking water safe.” If I need a hose in the future, I may opt for this one. But I ended up ditching the hose idea altogether after reading the comments on my previous post.
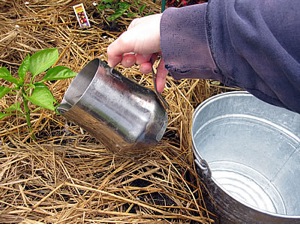
Forget the hose!
Several readers suggested using a watering can instead of a hose. And one of my Facebook friends explained how he waters each plant individually, ladling water from a bucket.
So I’m using a combination of both methods, watering the seeds with a Behrens galvanized steel watering can and scooping water out of a steel bucket with a little pitcher to water the plants.
I’m finding watering my plants this way to be not only good for them but good for me, too. It’s a little bit slower and relaxing. I get to spend some time with each baby in the morning, see how they’re doing, have a little chat. It’s a nice way to start my day. I’ve heard people say you should water plants at night. But according to Organic Gardening’s tips for plant watering:
In warm weather, water in the morning to give plants a chance to drink up before the hot sun or strong winds evaporate the moisture. This protects plants from wilting in the afternoon heat, too…If you can’t water in the morning, try for late afternoon—but not too late; the foliage should have time to dry before the sun goes down so it doesn’t develop fungal diseases.
Replanting
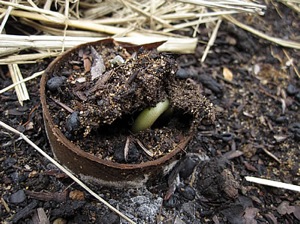
Three weeks after planting my first seeds, only the chard had peeked out of the soil. Worried that I had possibly washed away my seeds with my violent garden hose, I decided to do some replanting. But this time, I used the Mrs. Green’s toilet paper roll idea. (We collect our TP rolls to donate to a local reuse center for art projects, so I already had a few of them saved up.) Instead of making pots out of the cardboard tubes, I cut them in half and twisted them directly into the soil of my raised bed.
Using the toilet paper tubes accomplished several things. First, I could actually see where I planted the seeds this time, and second, the tubes protect the seeds from being washed away. In fact, I can just pour a little water into each tube. Eventually, the cardboard will compost into the soil.
The plan has worked like a charm. Most of the seeds planted in the toilet paper tubes came up right away!
Plastic-free Garden Gloves
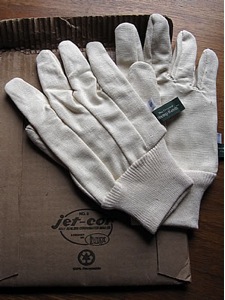
In my first post, I also asked about plastic-free gardening gloves. In the stores, I had found most gloves made of or coated with synthetic material. And since I’m a vegetarian, I didn’t want leather or suede, which seemed to be the alternative. I did find cotton gloves, but they were covered with little PVC plastic dots. Finally, searching online, I decided on Hemp Hands gloves made from 100% hemp canvas. Hemp is a much more sustainable crop than cotton, requiring fewer chemicals and water to grow and yielding much more fiber per plant.
When ordering the gloves, I requested no plastic packaging. They arrived in a plain cardboard mailer.
The thing is… they’re so pristine, I haven’t had the heart to get them dirty. So they sit unused, waiting to do the job they were designed for, while I continue to dig in the dirt with my bare hands. What was I thinking?
My (Almost) Plastic-free Garden
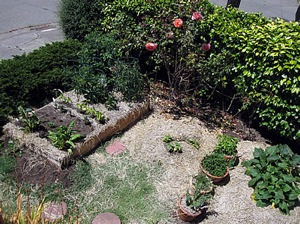
It’s been about two months since I planted my first seeds. Here’s the view of my front yard this afternoon…
On the left side of the box: one nasturtium plant (the others have not come up);
In the box from left to right: Swiss chard (which I’ve been eating for a week now!) and some other greens that I planted a bit later, baby carrots (only one plant so far, no sign of the others yet.), marigolds (ready to bloom any day now), wax beans (having problems… more on that below), peppers, and tomato plants.
Mound number one: cucumbers (having more problems.)
Terra Cotta pots: Oregano, rosemary, mint, basil (which I’ve been using for a few weeks).
Mound number two: Yellow squash and zucchini (that are taking off like gang busters.)
I have questions for you! Go to Maria’s Farm Country Kitchen Facebook page to see photos of my garden and help me!
Want to see what Maria is up to? Sign up today to receive Maria’s Farm Country Kitchen Second Helping newsletter delivered free to your inbox every Wednesday starting the week of July 11.
To celebrate, we’re hosting a giveaway-a-day until the unveiling of her newsletter on July 11! Enter for a chance to win Maria’s Garden Guru kit, which includes a copy of Tomorrow’s Garden and a set of compostable CowPots. Email as described below before July 8, 2011.
1. Email rodalecontests@rodale.com with Maria’s Farm Country Kitchen Garden Guru Sweepstakes in the subject line. Include your first and last name, complete home mailing address, daytime telephone number and date of birth.
Minimal Disclosure: No purchase necessary to enter or win. A purchase will not improve your chances of winning. Void where prohibited. Maria’s Farm Country Kitchen Garden Guru begins at 7:30am EST on July 7, 2011 and ends at 11:59 pm EST on July 7, 2011. Must be 18 and legal resident of 50 United States or DC. For Official Rules, go here. Rodale Inc., 400 South 10th St., Emmaus, PA 18098 is the operator of the sweepstakes.


Interesting ideas, but handwatering anything other than a small garden with few plants is far too time consuming for anyone who works outside the home. I also wonder if mature plants could be adequately watered this way (that’s a lot of pitchers of water per plant per day to achieve an adequate deep watering), assuming the plants need to be watered at all. I prefer to mulch with chunked or shredded bark as it holds moisture in the ground quite well and the layer of mulch elminates the need to water for the most part once plants are established.
Nice blog….I also love all natural and hate chemicals. Please view my blog and website at http://www.trynaturalsolutions.com
Thank you so much…Bonnie
Is there lead in Terra Cotta pots that could leach into the soil?
I am a new organic gardener and need all the help I can get. Any information that would help me produce wonderful vegetables wold be wonderful.
What about fertilizer? Widely available organic options include fish/seaweed emulsion in a plastic bottle or some sort of solid/granular. I use espoma’s plant-tone which comes in a plastic bag.
I know compost mixed in when you plant is ideal, but that doesn’t work for house plants.
Melissa, have you thought about vermicomposting (worm bin)? I have one and it’s a great way to get rid of veggie waste in the kitchen. The bin has a drain spout to harvest “worm tea” (excess liquids as a result of the process inside the bin) which makes good liquid fertilizer for potted plants. The bin is odor free and very convenient (especially in winter).
I just wrote in my part two On How To Detoxify Your Body In 7 Days about cleaning up personal environmental living spaces by omitting plastic and especially housing our food. I recommended shopping at thrift stores for glass containers of all sizes and shapes.
I am planting a variety of squash, I feed a group of Seniors in day care near by. My water is not working, so this makes me feel better about hand watering.
I just could not go away your site prior to suggesting tht
I relly lovedd the usual information a person supply onn your guests?Is
gonna be again ceaselrssly in order too check up onn
new posts
Great blog you have here.. It’s difficult to find high quality writing like yours these days.
I truly appreciate people like you! Take care!!
You ought to take part in a contest for one of the finest sites
on the web. I am going to recommend this blog!
Excellent web site. A lot of helpful info here.
I am sending it to several pals ans additionally sharing in delicious.
And of course, thanks to your effort!
Wow, superb weblog structure! How long have you been blogging for?
you make running a blog glance easy. The full look of your website is wonderful, as well as the content!
I don’t even know how I stopped up right here, but I assumed
this publish was good. I don’t realize who you are however definitely you
are going to a well-known blogger in case you aren’t already.
Cheers!